
Step-by-Step in Pictures
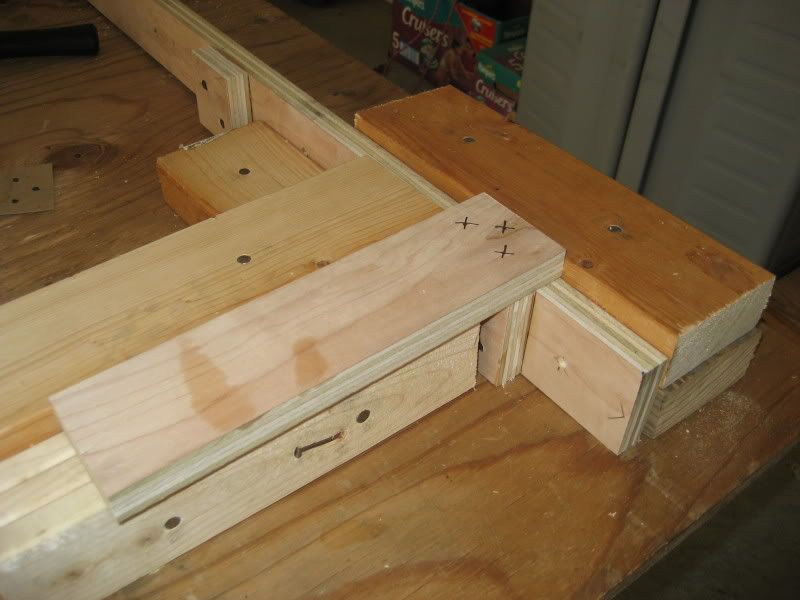
Picture 1 The first step is to cut the 1x3 stick lumber to the correct lengths. I actually use 1x3s ripped from birch plywood instead of standard dimensional pine lumber; this yields added strength and dimensional stability. This particular bracket will be 11" deep on all three levels, so the joists have been cut to 10 1/4" long (a 1x3 front board to be attached to the fronts of the joist is 3/4" wide and will bring the shelves to the correct 11" depth). Here are three joists, three cleats, and the 36" pilaster that will be used to build a single bracket:

Picture 2 Next, the correct locations for the tops of the joists and the pilot holes for mounting the bracket to the wall are marked on the pilaster. The tops of each bracket will be mounted on the wall along a chalk line snapped at 72" above floor level, so I take all of my measurements from the top of the pilaster. For example, the top level of the layout will be at 69" above floor level, so if the top of the pilaster will be 72" above floor level, I mark the location for the top of this joist 3" from the top of the pilaster. The remaining joists are marked at 15" and 30" from the top of the pilaster. The locations of the four pilot holes for the screws holding the bracket to the wall are marked at 2", 12", 22" and 33" from the top of the pilaster. Here is a photo showing a marked pilaster (note that the pilot holes are not centered on the long axis pilaster--this particular bracket is mounted next to a doorway and the only available wall stud requires the pilot holes to be 3/4" from the right edge instead of the usual 1 1/4" centered location):

Picture 3 This is a closeup showing the pre-drilled, countersunk hole for the top pilot hole in the pilaster. The nifty little tool is a quick-change drill/driver by Ryobi (I got mine at Home Depot), which allows you to quickly go back and forth between drilling pilot holes and driving screws without having to rechuck the bit each time. This is a real time saver!

Picture 4 Next the three cleats are attached to the pilaster. The cleats provide an additional surface to take the screws that hold the joist to the bracket, allowing for a much stronger joint. I have a jig that allows me to mount a cleat to a pilaster perfectly square each time. Here is the pre-marked pilaster inserted into the jig awaiting the first cleat:

Picture 5 This is the same picture as above except that the cleat has been placed in the jig for mounting to the pilaster:

Picture 6 After pre-drilling two countersunk holes through the cleat into the pilaster, I apply glue to the joint:

Picture 7 Next, the cleat is placed in position and attached with two screws. I use 1 1/4" coarse thread drywall screws for assembling the brackets. The excess glue will squeeze out and needs to be wiped off the bracket and the jig with a damp cloth (If you forget to wipe glue off the jig, it will get all over the next pieces you assemble and if a glob dries on the jig, the pieces may not fit into the jig correctly. Can you tell I found out the hard way?):

Picture 8 This picture shows the first cleat attached to the pilaster, which has been repositioned in the jig so the next cleat can be installed. The same process is repeated for all three cleats:

Picture 9 With all three cleats attached to the pilaster, the assembly is moved into a second jig I built to insure that the joists are accurately attached to the pilaster. Here is the pilaster placed in the joist jig ready for the top joist to be attached:

Picture 10 The first joist has been set into place and the locations for the three pilot holes have been marked. I have a cardboard template that allows these locations to be marked in the correct location each time (you can see the template laying on the work table at the upper left of the picture):
Picture 11 You can see the pilot holes have been drilled through the joist into the pilaster/cleat for the top joist and glue has been applied to the joint:

Picture 12 After glue has been applied, the joist is attached using three screws (again remember to wipe the excess glue off the work piece and the jig before moving to the next joist):

Picture 13 Attachment of the top joist has been completed and the pilaster has been repositioned in the jig ready for the next joist to be attached. All three joists are attached using the same process:

Picture 14 The jigs help insure that the assembly goes together quickly and perfectly square each time:

Picture 15 The finished product, ready to be mounted on the wall:

Picture 16 The crew foreman gives his stamp of approval to the first bracket:

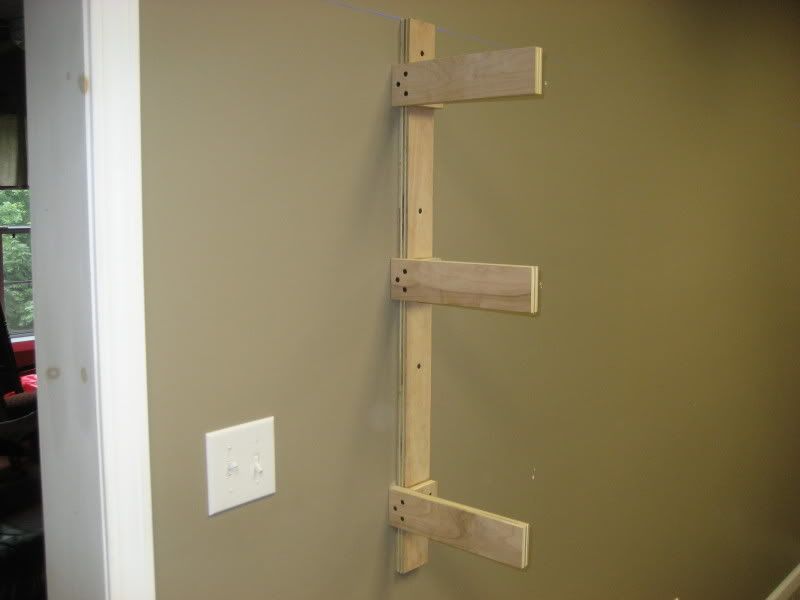
Picture 17 Finally, the first completed bracket is attached to the wall of the layout room. The bracket is attached using four 2 1/2" coarse thread drywall screws through the four pilot holes that were drilled in one of the first assembly steps:
.

