The key to the success of my feeder soldering method is the use of Micro Engineering flex track with pre-weathered rail. I was not happy with this track when I first started using it, mostly because I am used to "springy" flex track like Atlas. However, the more and more I use the Micro Engineering flex track, the more I like it. In fact, since this track enables me to solder feeder wires without damaging or destroying the track, I have decided to switch completely to Micro Engineering code 55 flex track for all of my track with the exception of turnouts. I will continue to use Atlas code 55 turnouts.
Step-by-Step
Step 1 I solder my feeders three ties in from the end of a section of flex track. I solder feeders to every piece of flex track because I will be leaving gaps between each piece of track to allow for expansion/contraction. When I solder the feeder wires to the bottom of the rails, I want to make sure they are soldered to a spot between a set of ties so that the tie spacing remains constant; the weathered rail makes it easy to mark the right spot. To do this, first cut away any plastic between the third and fourth tie in from the end of the track. This will allow access to both rails from below between the ties:

Step 2 Next, using a small jewelers file, file the bottoms of both rails between the ties to remove the weathering:

Step 3 Finally, slide the three "outer" ties completely off of the piece of flex track. You also want to push the adjacent "inner" ties inward so they will not be affected by the heat of the soldering iron. I cut gaps between the adjacent four inner ties and pushed them inward, away from the spots where the feeders will be soldered:

Step 4 Next, tin the feeder wires and the spots on the rails that were filed away in the previous step. I use 20 gauge solid wire for my feeders and strip about 1/8" of insulation off one end of each wire. I use black for the inner rail and red for the outer rail--be sure to be consistent throughout the layout to avoid short circuits. As for the rails, the use of weathered rails pays off big time with regards to tinning. Solder will only stick to clean metal, so in our case, the solder will stick to the filed away spots and will not stick to the weathered rail. This is perfect because it will allow us to slide the plastic ties back onto the rails right against the soldered feeders, keeping the tie spacing exactly as it was before.
I apply a tiny amount of flux gel to the filed spots in the rail and the bare wire ends. I then use a Weller 40-watt soldering iron with a flat chisel tip to heat the rail and apply a tiny bit of solder. I do the same thing with each feeder wire:

Important: The key to this step is to be quick. I hold the tip of the soldering iron to the rail and immediately apply the solder then quickly remove the tip from the rail. The whole process takes bout two seconds; any longer and you risk melting the nearby plastic ties. By sliding the ties away from the spots on the rails to be soldered, you get a nice safety margin and I have yet to damage any ties when soldering track this way. I also found that by using the Weller 40-watt iron (which is a blowtorch when compared to the typical 25- or 30-watt soldering iron you get off the shelf at Radio Shack), you can heat the rail/wire very quickly and get the solder to flow within a second or two. This means you can get out before the heat reaches the plastic ties.
Important: You can see where I made black marks along one edge of the ties. This is to remind me which rail is to have the black feeder wire soldered to it. It is very easy to get the rails reversed when you flip over a piece of track, so I always mark one side of the ties before I start soldering.
Note: You can see a few drops of liquid and some areas that appear wet in the above photo. This is actually the residue of the flux gel that I use when soldering. The gel turns to liquid when heat is applied and the soldered areas can get a bit messy with this goo. However, cleanup is very simple as I just use an old toothbrush wet with 70% rubbing alcohol to scrub the area after all the soldering work has been completed. This removes all residue from the soldering process.
Step 5 Once the track and wires have been tinned, it is a piece of cake to solder the wires to the rails. Simply hold the tinned end of one wire against the tinned spot on one rail and apply heat until the solder flows. Repeat with the other wire:

Step 6 Finish the process by scrubbing the work with the toothbrush dipped in rubbing alcohol and sliding the plastic ties back in place:

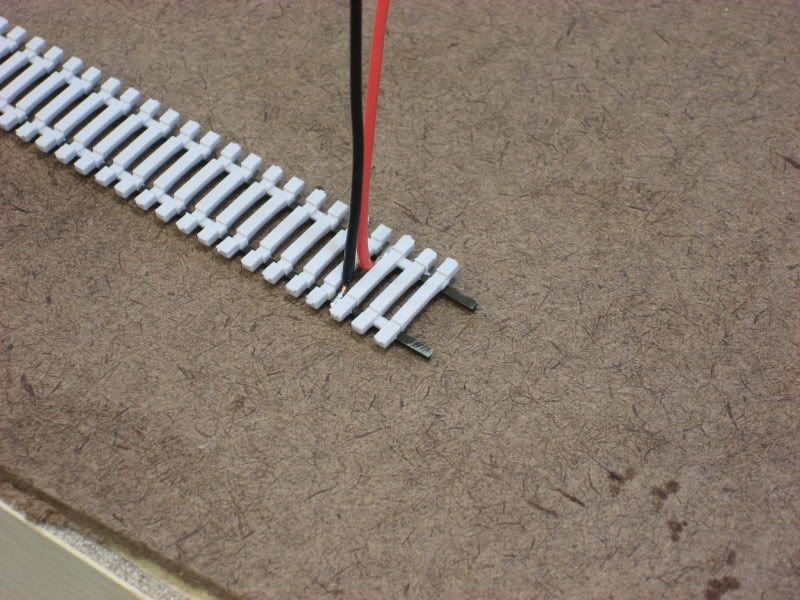
You now have a piece of flex track with feeder wires that is ready to be installed on the layout:

.


